Docker
Docker Workshop
A practical introduction to Docker
What you will learn today
- What docker is and what it solves
- How to build your own docker images
- How to optimize images
- How to secure image
Prerequisites
- Have cloned the demo app - https://github.com/RodrigoSaint/demo-application
- Have Docker installed
- Have VScode installed - Optional
What is docker?
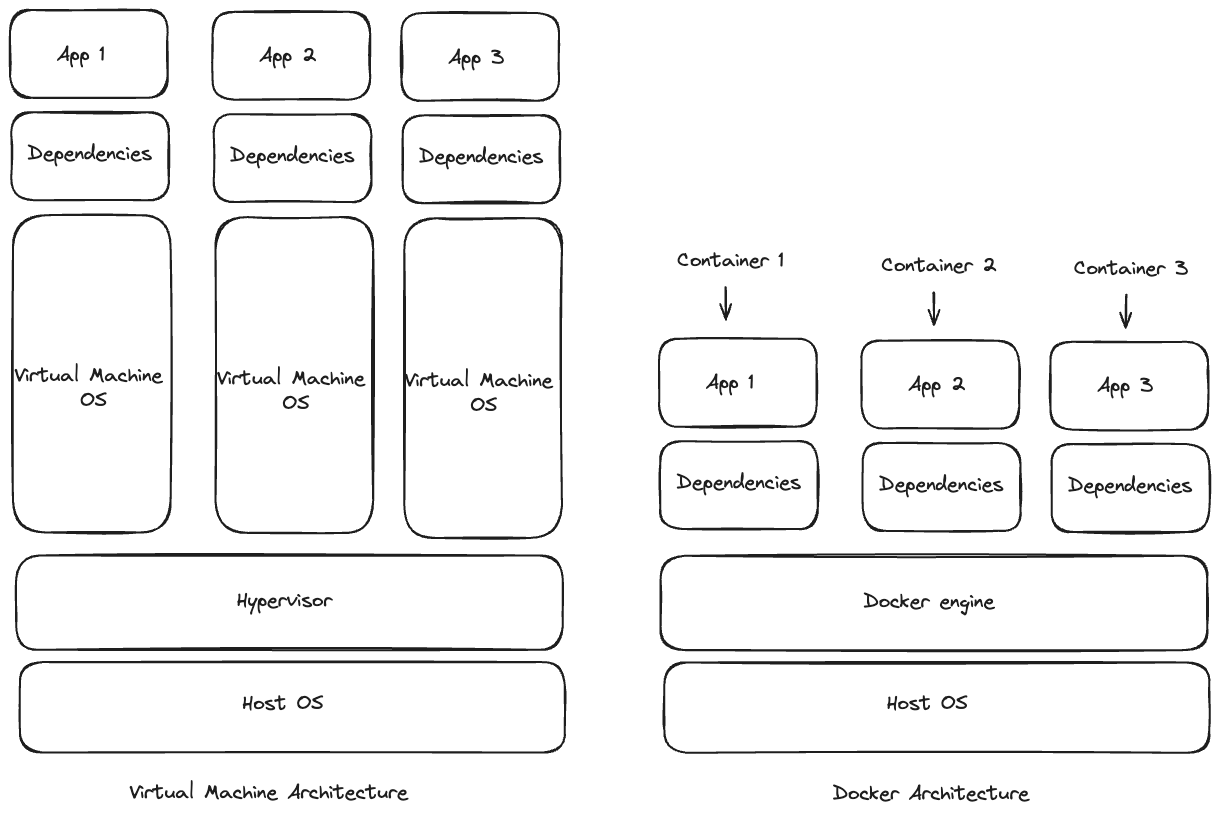
Docker is a platform that uses the concept of containers to package applications, making them easier to build, deploy and manage.
With docker you build the application and then describe in a separate config file, what are the steps to make your application runnable.

Docker Architecture
How is it different from traditional virtual machines?

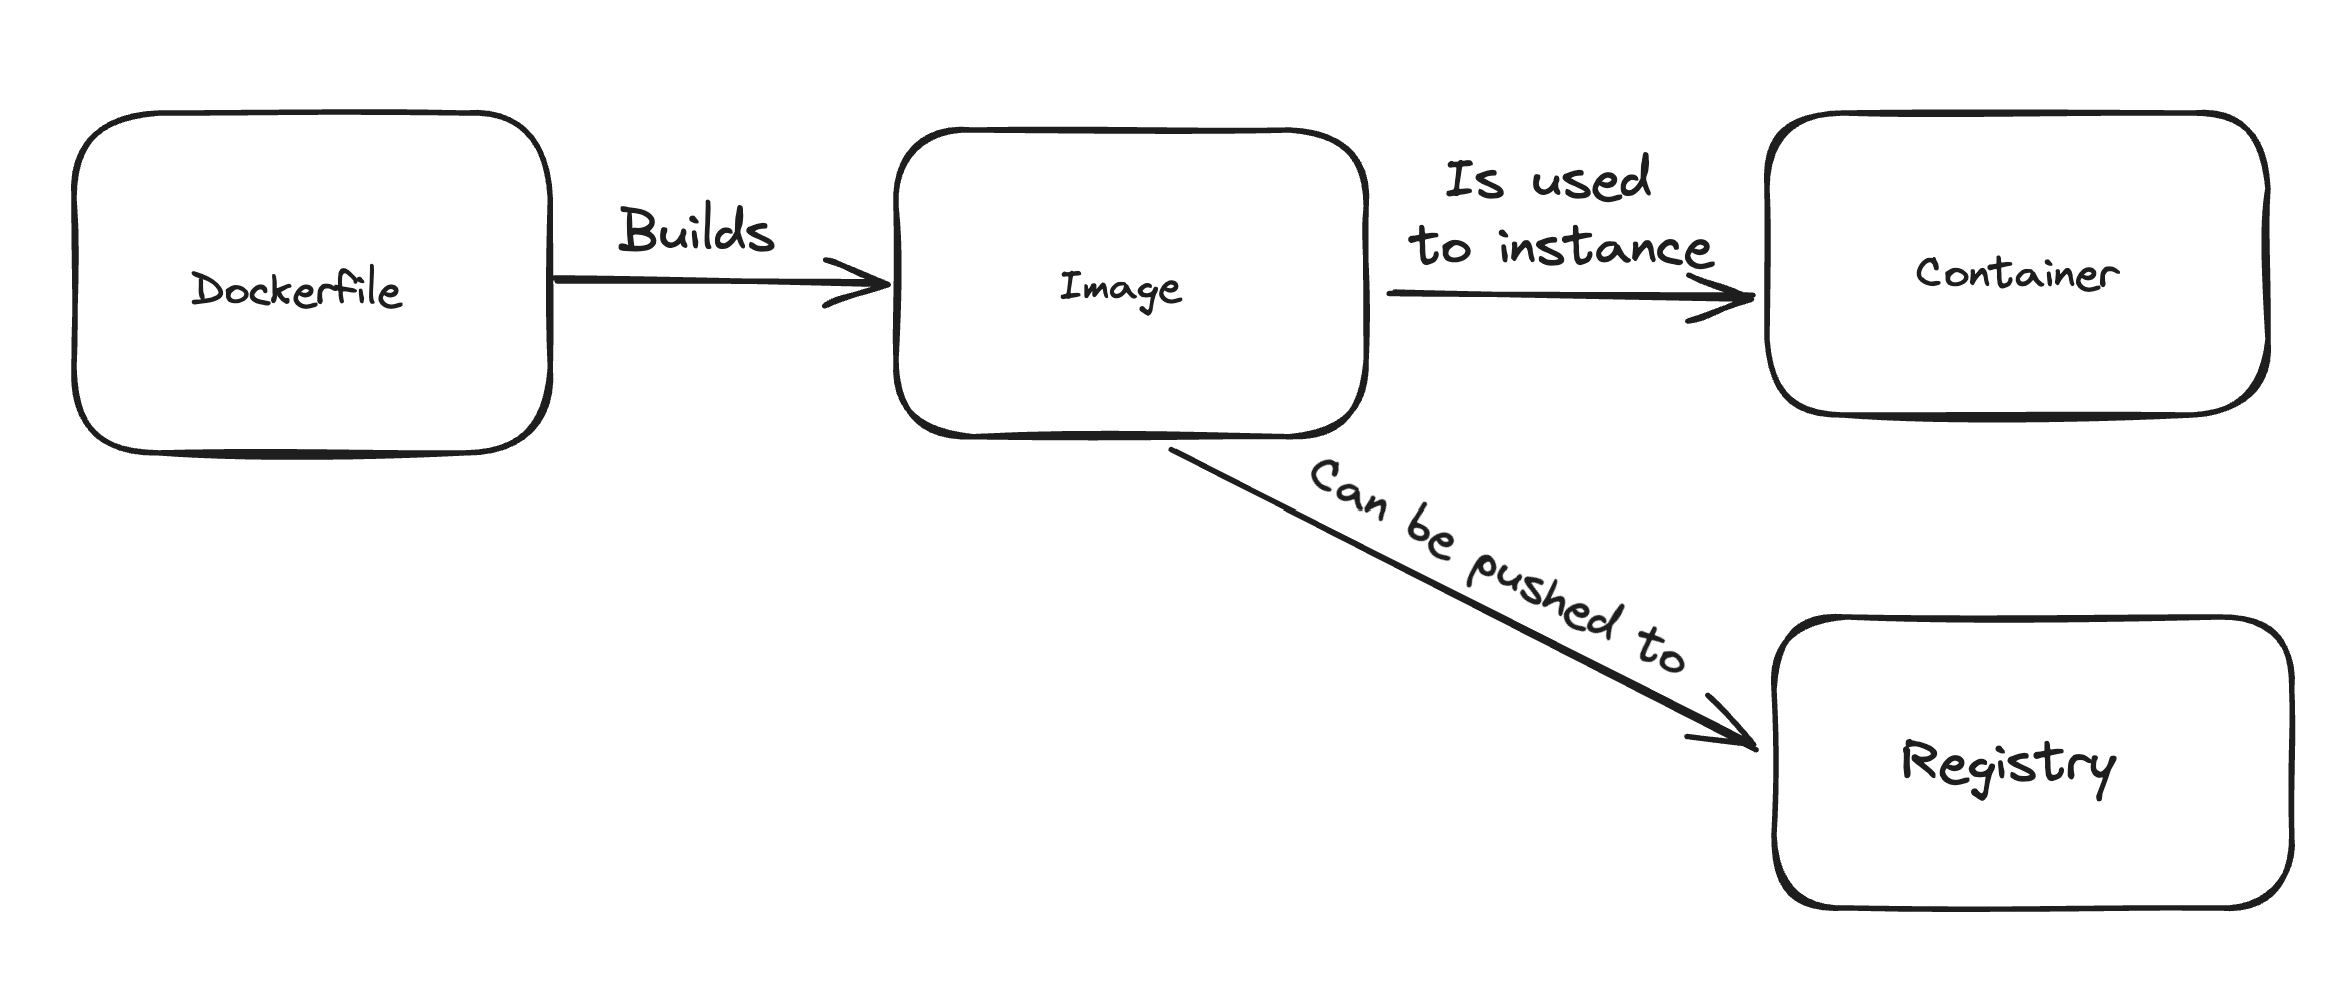
Glossary
We won't go deep on docker concepts, but this are the most important terms to know when dealing with docker:
- Docker Image - The image generated after running a dockerfile. It serves as a blueprint for containers.
- Docker Container - The instance of an image. You can think as the running application.
- Docker Registry - A registry used to store docker images
- Base Images - Images used on Dockerfile definitions.
Glossary

Dockerfile
Docker builds images by executing instructions form a Dockerfile, which contains the steps to build an image. A dockerfile follows this structure:
# Comment
INSTRUCTION arguments
The instruction is not case insensitive but the convention is to use it in uppercase.
The first instruction in a dockerfile should be FROM which describe what is the base image that will be used.
Dockerfile main instructions
| Instruction | Description |
|---|---|
ADD |
Add local or remote files and directories. |
* ARG |
Use build-time variables. |
* CMD |
Specify default commands. |
* COPY |
Copy files and directories. |
ENTRYPOINT |
Specify default executable. |
* ENV |
Set environment variables. |
* EXPOSE |
Describe which ports your application is listening on. |
* FROM |
Create a new build stage from a base image. |
LABEL |
Add metadata to an image. |
* RUN |
Execute build commands. |
SHELL |
Set the default shell of an image. |
* USER |
Set user and group ID. |
* VOLUME |
Create volume mounts. |
* WORKDIR |
Change working directory. |
Dockerfile example
FROM node:lts-iron
EXPOSE 4000
COPY . ./app
WORKDIR ./app
RUN npm install --production
CMD ["node", "."]
- To build the image -
docker build -t backend-demo:latest . - To run the image -
docker run --init backend-demo:latest
Container Network
Running the image you built will throw a connection error even though your database is running. This happens because, by default, your container will run on bridge mode.
These are the network types available:
| Driver | Description |
|---|---|
* bridge |
The default network driver. |
* host |
Remove network isolation between the container and the Docker host. |
none |
Completely isolate a container from the host and other containers. |
overlay |
Overlay networks connect multiple Docker daemons together. |
ipvlan |
IPvlan networks provide full control over both IPv4 and IPv6 addressing. |
macvlan |
Assign a MAC address to a container. |
More on - https://www.youtube.com/watch?v=bKFMS5C4CG0
Container Network
Now if you run the command specifying the network as host, the container ports will be exposed to the host and vice-versa.
Running this command docker run --init --network host backend-demo:latest, will work now as if you are running the application directly in your SO
Main commands
Images
- Build an Image from a Dockerfile -
docker build -t - List local images -
docker images [name] - Delete an Image -
docker rmi - Remove all unused images -
docker images prune
Main commands
Containers
- Create and run a container from an image, with a custom name:
docker run --name <container_name> <image_name> - Run container in the background
docker run -d <image_name> - Run container interactively
docker run -d <image_name> - Start or stop an existing container:
docker start|stop <container_name|container_id> - List running containers
docker ps
More on - https://docs.docker.com/get-started/docker_cheatsheet.pdf
Image Layers
Docker images are created by connecting many read-only layers, which are stacked on top of each other to form a complete image.
Each layer is read-only except the last one - this is added to the image for generating a runnable container.
The layers can be cached, which can improve the build time drastically.
Images Size
Let's check the image that we generated by using the command docker images backend-demo. The result should be around 1.14GB, but shouldn't it be small?
The image size depends highly on the base image size, since you could have a lot of things that you are not using leading to a lot of wasted.
To solve this issue it is important to always check the type of base images you are picking. So now let's change the base image to alpine:
FROM node:current-alpine3.19
EXPOSE 4000
WORKDIR /app
COPY . .
RUN npm install --production
CMD ["node", "."]
Images Size
Now the image size is reduced from 1.14GB to 181MB! 😱
And this can go even further if we use images like Distroless or Scratch that can take the image down to 67.5MB

Images Size
If we have such a huge difference in size, Why not just choose the smallest?
The smallest image might not be suitable for all cases, since it might lack a couple of functionality that you would expect, such as package manager, shell or any other program you would expect to find in a standard Linux distribution.
You can find more details about this here - Link
Multi-stage Build
Even though the biggest impact in an image size is usually the base image, it is possible to have an image that is unnecessarily bloated because of your application, specially because of node_modules.

Multi-stage Build
Let's look at our frontend as an example. Currently its node_modules folder has 114Mb, so if we create an alpine image from it we will have something around 266MB.
FROM node:current-alpine3.19
EXPOSE 5173
WORKDIR /app
COPY package.json package-lock.json src public ./
RUN npm install
CMD ["npm", "run", "dev"]
Multi-stage Build
So how can we reduce it? The first step is to think, what do we don't need.
For production ready images we:
- don't need dev dependencies installed
- don't need to have test files
- don't need to have non-transpiled files
- and for this specific case we don't need NodeJS, since we just want to serve static files
We can remove some of the files, but unfortunately we still need tools to transpile the code.
While we need these tools, that doesn't mean that we need to have them in our final image. We can achieve that by using multi-stage builds.
Multi-stage builds
Multi-stage builds are Dockerfiles that contain multiple FROM instructions and that can copy files from each other, allowing you to have one stage using installing all dependencies and the last stage only using the dependencies that are required to run the application.
FROM node:current-alpine3.19 as builder
# as [name] describes the stage's name
WORKDIR /app
COPY . ./
RUN npm install
RUN npm run build

FROM busybox:1.35
# Using a smaller image
WORKDIR /home/static
COPY --from=builder app/dist .
# Copies the files we created on builder
EXPOSE 3000
CMD ["busybox", "httpd", "-f", "-v", "-p", "3000"]
# Serves files on port 3000
Multi-stage builds
Running the image with docker run -p 3000:3000 -d rodsantos/demo-frontend:latest and navigating to http://localhost:3000 will show us the application.
And now if you take a look on the image size using the command docker images frontend-demo. You can see that our new image went from 266MB to 4.36MB

Caching
As mentioned before each instruction will generate a layer in your final image and when a layer changes that all the layer that come after needs to be rebuilt.
So let's run the build command for backend again:

Since we didn't change anything the build had everything cached and it was quite fast, but now lets modify index.js and run the command again.
Caching
Now the image didn't have all the steps cached and took almost twice of the time! If you look closely to the outputs, you will see that the culprit is the npm install --prod which is now being executed again while we didn't have any changes to package.json or package-lock.json

Caching
Since content of our COPY changed, all the following layers are executed again, so to solve this issue we can split how the copy is done.
FROM node:current-alpine3.19
WORKDIR /app
COPY package.json package-lock.json ./
RUN npm install --production
COPY index.js ./
CMD ["node", "index.js"]
Now, no matter what changes we do on index.js our installation step won't be executed unnecessarily!

Basic Security
By default a docker container run as a Root user and this can be a really serious security issue. To solve this issue it is recommended to change the user to one that has less permissions.
FROM ubuntu:latest
RUN apt-get -y update
RUN groupadd -r user && useradd -r -g user user
USER user
First we create the user and then using the USER instruction we switch to this user.
More on - https://www.geeksforgeeks.org/docker-user-instruction/amp/
What wrong with this image?
Now that you learned the basics of Docker, can you tell me what is wrong with this Dockerfile?
FROM node:lts-iron
COPY . ./app
WORKDIR app
RUN npm install --production
CMD ["node", "."]
What was not covered
- Volumes - https://docs.docker.com/storage/volumes/
- Docker Compose - https://docs.docker.com/compose/
- Docker Swarm - https://docs.docker.com/engine/swarm/